Getting Started
Before you start
To get access to the system to start building your website, you'll need to email the website administrator with your name, your Group's name, your email address and a contact phone number. Once we have that, we will send you a temporary password and you're ready to go.
Before you log in though, take a bit of time to think exactly what you want on your website. You'll find it easier if you have a fairly clear idea of what pages you want (and any sub-pages) and what widgets you would like. Have a look at some other groups' websites to give you some ideas on what will work best for your group.
Once you have a better idea of what your website will include, you're ready to get started. Don't forget that, if you would like a brief introduction to how it all works (or just need some help with some particular problem), you can request an online session with our website administrator.
About the Opening Screen (Site Information)
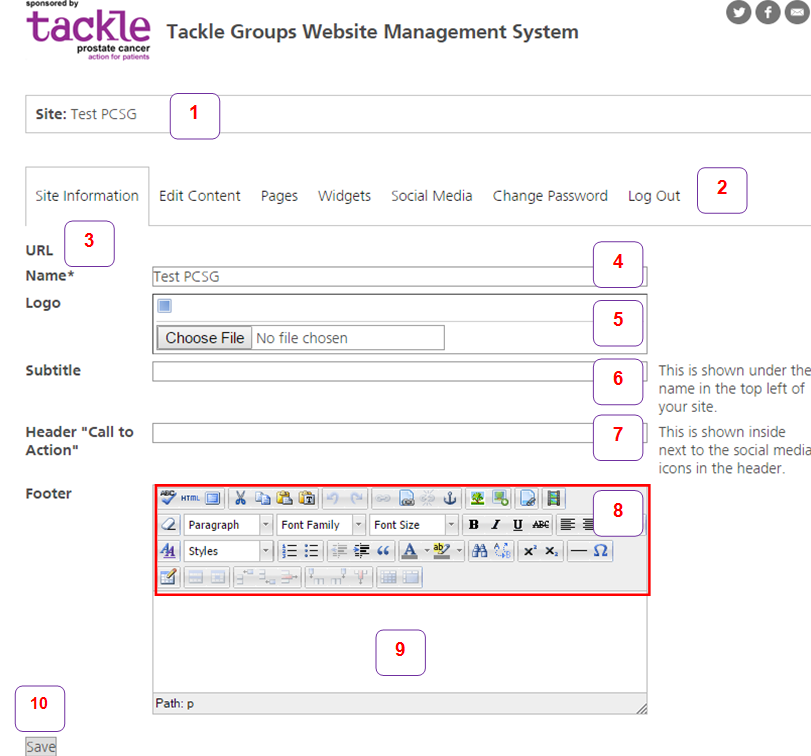
When you log in for the very first time, the screen below appears. There is an explanation of each numbered section beneath it.

| 1. | This is the name that will be displayed as your Group name on every screen on your website. |
| 2. | These are the tabs which allow you to control the content on your website plus changing your password and logging out. |
| 3. |
The URL (Uniform Resource Locator) is the link that will take you to the home page of your website. We recommend that you get your own domain which you can point to the link that you have been assigned by our system. Your own domain will obviously be much easier to remember and publicise. Note that the URL will not display until you have added a Page (see here for adding pages). |
| 4. | The name of your Group which will appear in Site (see point 1 above). |
| 5. | If you have a logo, you can upload it here. It will only be displayed once you have Saved the page. |
| 6. | Subtitle is where you could add a strapline if you have one or you could put what area you cover or who you welcome etc. As it says on the right hand side of the screen, this will appear under the name in the top left of your site. |
| 7. |
The Call to Action allows you to put something you consider important that you would like to appear at the top of every page eg Call the National Help Line 0800 035 5302. You can have more than one line. Note that you can make some of the text a mauve colour by putting it in two asterisks on either side. So, to make it say Call the National Help Line 0800 035 5302, key it as Call the National Help Line **0800 035 5302**. Any word or words which are within two asterisks will appear as mauve. |
| 8. |
The icons within the red rectangle are the editing controls for the majority of text on your website. They allow you to change the font, the style, make text bold or italic, add links to pages on your site or other websites, add pictures or insert tables etc. The functionality is not as sophisticated as most modern word processing packages eg Word but gives you enough variation. How to use it is explained in the Editing Content tutorial. |
| 9. |
This section controls what appears in the footer of your website on every page. By default, it will include a copyright message saying that the website is your copyright. You can make it what you want and, if you do add something, it will overwrite that copyright message so you will need to include your own (if you want one). We recommend putting some or all of these in the footer:
Please note that the information on our website should not be taken as medical advice which should always be obtained from qualified medical practitioners.
|
| 10. | The Save button. IMPORTANT remember to use this button since you won’t be reminded if you move to another tab or preview a page so you will lose any changes you have made. |


